Computer Tricks
Mac OS X
How to take a screenshot on your Mac
8:16 AMIf you are a Mac user you might want to take screenshot. Here is how to take a screenshot on your Mac. Its easy and simple, only few clicks away..
To take a screenshot of the menu without the title, hover over the menu, press Command (⌘)-Shift-4 and the Space bar. To cancel, press Escape (esc) before you click. In Mac OS X v10.6 and later, the screenshots are saved as PNG files on the desktop.
You can take screenshots of your whole screen or just part of it. Screenshots are saved automatically as .png files on your desktop.
Take a screenshot of your whole screen
- Press Command (⌘)-Shift-3.
- Find the screenshot as a .png file on your desktop.

Take a screenshot of part of your screen
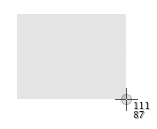
- Press Command-Shift-4. The pointer changes to a crosshair pointer.
- Move the crosshair pointer to where you want to start the screenshot.
- Drag to select an area. While dragging, you can hold the Shift key,
Option key, or Space bar to change the way the selection moves.

- When you've selected the area you want, release your mouse or trackpad button. To cancel, press the Escape (esc) key before you release the button.
- Find the screenshot as a .png file on your desktop.
Take a screenshot of a window
- Press Command-Shift-4. The pointer changes to a crosshair pointer.
- Press the Space bar. The pointer changes to a camera pointer.
- Move the camera pointer over a window to highlight it.
- Click your mouse or trackpad. To cancel, press the Escape (esc) key before you click.
- Find the screenshot as a .png file on your desktop.
This works with Finder windows and most application windows.
Take a screenshot of a menu
- Click the menu to reveal its contents.
- Press Command-Shift-4. The pointer changes to a crosshair pointer.
- Drag to select the menu.
- Release your mouse or trackpad button. To cancel, press the Escape (esc) key before you release the button.
- Find the screenshot as a .png file on your desktop.
Take a screenshot of a menu without the title
- Click the menu to reveal its contents.
- Press Command-Shift-4. The pointer changes to a crosshair pointer.
- Press the Space bar. The pointer changes to a camera pointer.
- Move the camera pointer over the menu to highlight it.
- Click your mouse or trackpad. To cancel, press the Escape (esc) key before you click.
- Find the screenshot as a .png file on your desktop.
Learn more
- Screenshots are saved as .png files on the desktop in Mac OS X v10.6 and later. They're automatically named "Screen Shot date at time.png."
- To save your screenshot to the Clipboard instead of a file on your desktop, use Command-Shift-Control-4.
- You can open screenshots with Preview or other image-editing apps.
- Some apps, such as DVD Player, might not let you take screenshots of their windows.
Taking Screenshots in Mac OS X
- Command-Shift-3: Take a screenshot of the screen, and save it as a file on the desktop
- Command-Shift-4, then select an area: Take a screenshot of an area and save it as a file on the desktop
- Command-Shift-4, then space, then click a window: Take a screenshot of a window and save it as a file on the desktop
- Command-Control-Shift-3: Take a screenshot of the screen, and save it to the clipboard
- Command-Control-Shift-4, then select an area: Take a screenshot of an area and save it to the clipboard
- Command-Control-Shift-4, then space, then click a window: Take a screenshot of a window and save it to the clipboard
How do I do a print screen?
Please follow the same instruction as provided to take screenshot.To take a screen shot and save it as a picture. Click the window you want to capture. Press Alt+Print Screen by holding down the Alt key and then pressing the Print Screen key. The Print Screen key is near the upper-right corner of your keyboard.


0 comments